


We will be using these photos, as a reference, to render Geometric Shapes in Colored Pencils and Charcoal. Utilizing two or more mediums, is called “Mixed Media.” It is good practice, to draw “Still Life’s,” to sharpen your skills as an Artist. For this project, I will be drawing the cylinder, cube, sphere, and cone. You will need 9×12 Bristol Paper, Pencil, Koh-I-Noor Woodless Colored Pencils, Hard Woodless Charcoal Pencil, White Prismacolor Pencil, Colorless Blender, Stump, Pencil Sharpener, Ruler, and Kneaded Eraser.

Step 1- Draw a cylinder. Begin the cube by matching the angel.


Step 2- Check and correct your angle, if needed. Draw the cube using 2 Point Perspective.


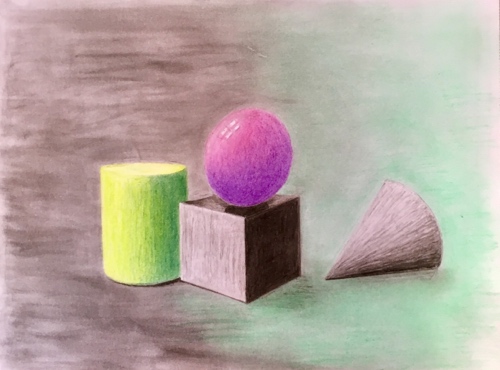
Step 3- Draw a circle on top of the cube and a cone to the right. *Notice the cylinder, cube, and cone already have a three dimensional shape and the circle does not. The circle needs value to become a sphere. Draw highlights on the sphere. Take a kneaded eraser and pick up excess graphite.


Step 4- Color the highlights, on the sphere, with a white pencil. I will be using scarlet lake and dark violet to color the sphere.


Step 5- Color the sphere with curved strokes in scarlet lake. Overlap, the scarlet lake, with dark violet around the bottom of the sphere, and blend.


Step 6- Use light green, sap green, and hookers green to color the cylinder. Turn the picture upside down, if you’re right handed, to prevent the sphere from smudging. Use a ruler and draw the outside edge, on the right, with light green. Color, a little past the halfway mark, using straight (not curved) lines with light green. Overlap the light green by shading with sap green, then color. Create a value study, from left to right. Outline, with a ruler, the left edge with hookers green. Color, left to right. Overlap the hookers green by shading on top of the sap green. Blend the cylinder left to right. Make any adjustments, if needed. Turn the paper right side up. Color the top of the cylinder with white, then light green, and blend.


Step 7- Using a hard charcoal pencil, shade the top of the cube and color the spheres cast shadow. Blend carefully with a stump. Shade the highlighted area using straight lines. (hatching) Color the other side, by cross hatching, and blend with a stump. *Clean the stump often. Draw a dark line at the base of the cube, on the highlighted side, to ground the cube. Draw a curved line and a cast shadow, at the base of the cylinder. *See picture above.


Step 8- Using a ruler, draw a dark line on the side of the cone that touches the table, to ground the cone. (If you don’t ground the objects, they will appear to float) Lightly draw guide lines on the cone. Color and shade, creating a value study, from the bottom up. Blend carefully. Lightly pull out highlights with a kneaded eraser.


Step 9- Sharpen the dark green (teal or aqua) over the right side of the picture. Blend with a tissue using circular strokes above the “Still Life” and horizontal strokes below.


Step 10- Sharpen a woodless charcoal pencil over the left side of the picture. *If you have a wooden charcoal pencil or stick, rub the charcoal over sandpaper to get the charcoal dust. Blend with a tissue using horizontal strokes above and below the “Still Life.” Lightly shade in the cast shadows with charcoal. Make any adjustments.