

This project is going to give you the basic steps to take a reference photo and create a beautiful landscape using colored pencils. Today, we have the luxury of typing whatever type of landscape into a search bar and suddenly have access to a vast number of images to pick and choose from. A lot of artists pick more than one image and incorporate parts of each photo, they like, into one. This lesson will only focus on one reference photo. Print this picture so you can refer to it while your drawing and coloring. I used colored pencils (Koh-I-Noor Hardtmuth 24 woodless colored pencils), white and black Prismacolor pencils, Prismacolor Blender, 2B pencil, kneaded eraser, and a Tombow MonoZero 2.3 round Elastomer Eraser, for this project.


Step 1- Block out main areas, then draw the details. Use a kneaded eraser to pick up extra graphite.

Step 2- Lay in the shadows with black and blend.


* I will be using the Koh-I-Noor Hardtmuth Woodless Colored Pencils for this project. If you are using another set of colored pencils, try to match the color as close as possible. The name of the color each company labels their own set of colors are misleading, so keep that in mind when using your own colored pencils. I used the dark blue, light blue, sky blue, light grey, light ochre, dark green, white and black Prismacolor Pencils for this step.
Step 3- Zigzag light gray, light blue, and sky blue vertically, in the waterfall. Color the solid areas with dark blue and blend. Color the rocks with grey, white, and black using a zigzag stroke. *The zigzag pattern will create movement emulating water falling. Put in a hint of light ochre on the rocks and blend. *Blend the water and the rocks separately, cleaning your blender often. Hold your picture up to check your work, make adjustments before preceding to the next step.


Step 4- Fill in the trees with brown and blend. (the first picture) Zigzag dark yellow and light green horizontally to create the trees in the background. Weave in sap green and hookers green and blend. Add additional hookers green to create depth. *Make sure the lighter colors don’t get lost, so blend carefully.


Step 5- Using tight horizontal zigzags, color the little hill, in the background, with light ochre. Lay in hookers green, brown, and natural sepia using zigzags tightly on the hill and blend. Repeat steps on the hill, in front, using more hookers green and blend. Repeat step 4 for the trees in the background. Color the tree, in the foreground and background, with brown, natural sepia, and black using a hatching stoke, then blend.


Step 6- Complete the waterfall in the background using the same colors in step 3. Color the waterfall from the top down and from the bottom up. Make sure you don’t color over the tree. Next, use the dark yellow and the light green using squiggles. Color in the empty spaces with hookers green and blend. Color the tree trunk using the same technique as before and blend.

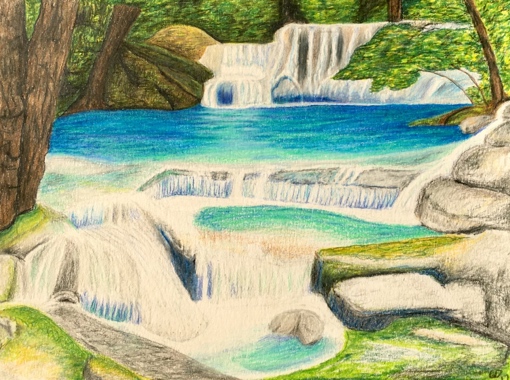
Step 7- Color the pond using horizontal zigzags with dark green (looks like teal).

Step 8- Fill in with light blue, dark blue, and sky blue using horizontal zigzag strokes. Make a value study going from the front and inner part of the pond lighter, with dark green. (teal, aqua) Transition into light blue (blue) and dark blue inside out to the edges of the pond, and blend. Color the front waterfall white. Add light gray zigzags on the rocks. In the foreground, lay in light ochre, sap green, and light gray in circular squiggles on the rocks. *See picture above.


Step 9- Color the water white with light gray zigzags and blend. Add more circular zigzags of light ochre, sap green, and light gray.

Step 10- Overlap previous colors and blend. Add light green circular squiggles in the foreground on the right and left side. Hatch in vertical strokes, light blue (blue) the little waterfall at the edge of the pond and blend. Color the little ponds, in the foreground, with dark green (aqua) and blend. Add a little bit of light blue to the little ponds to give it depth and blend.

Step 10- Shade the rocks with black to give them form and blend. Color over the moss with hookers green to give those areas depth and blend. Adjust colors and blend.